Sidebars & Footers
In this class we’ll show you how to create sidebars and footers for your website.
You can give your pages a sidebar and footer in two ways:
- By using the standard WordPress sidebar or footer created with widget areas and widgets. This is often easiest and is what you would do with most WordPress themes. However, this way you can’t use the Divi modules for your sidebar and footer, and it is also slightly more difficult to create differing sidebars on different pages.
- By using a speciality section for your sidebar and a global section as a footer. This method allows you to use the Divi modules in your footer and sidebar, which is great, and with a little trick you can also still use the usual WordPress widgets in your sidebar or footer.
If you’d like to use Divi Modules for sidebars and a footer, then it’s still necessary to go through the basics of creating sidebars and footers through widgets and widget areas, because you’ll need those skills for placing often used widgets such as Facebook Like Box, blog categories, etc.
Below, after a short intro, we show you how to create sidebars with widgets and widget areas as is usually done in WordPress.
After you have looked at the information here, you can continue to the class on
using the Divi Builder for your sidebars & footers through the button on the right.

Sidebar & Footer – Widgets
Class overview
In this part of the classroom we’ll show you how to manage your sidebar and footer using the standard WordPress Options. This is essential knowledge before you can start creating your actual widgets, and also for if you’d like to later use Divi Modules to create Sidebars & footers.
Once you’ve understand how the widgets work and how to manage them, you can move on to the Widget Idea Library where we’ll show you how to create some useful widgets.
But let’s first look at the basics:

1. Sidebars, footers & widgets – the basics
You’ve probably noticed that websites often have some areas that look the same on each page; at the bottom there is often a footer, and to the right of the blog there is often a sidebar. Sidebars can also be used on other pages by the way, and the Divi builder makes it easy to add custom created sidebars next to any of your content.
These areas of recurrent content (commonly seen as sidebars and footers) are called “Widget Areas” and filled with widgets.
The widget areas are most often filled with useful bits of information that you want your clients to find easily, such as contact details, or social media links. You can also use them to draw attention to new products or promotions you are running, or to introduce yourself and give your content a personal touch.
Next to a blog roll or individual blog posts, you will often see widgets such as a search box, a list of recent posts, blog categories, or an image linking to a special offer or other part of the website.
Open the toggles below to see an example of a sidebar and footer:
Example of sidebar

Example of a footer

2. Several useful Plugins
Working with widgets becomes a lot easier with the help of the Visual Editor Plugin, the Flexible Widget Title Plugin and the Widget Options plugin. If you have one of our website Starter Packs, these plugins will probably already be installed for your website. To check if they are installed, go to your dashboard > Plugins, and search for them with the search function at the top.
If you don’t have these plugins yet, open the toggle below for instructions on how to install the Visual Editor Plugin first, and open the next toggles to install the Flexible Widget Title Plugin and Widget Options plugin also.
Installing the Visual Editor Plugin
The Visual Editor plugin is a lovely little plugin to add to your WordPress Website. It allows you to create your widgets for your sidebar and footer with the Visual WordPress Editor that you also use for your posts and pages, making it a lot easier to create your content for your widgets. To install the Visual Editor Plugin, go to your Dashboard and navigate to the Plugins tab. Choose “Add New” at the top:  Type “Visual Editor Black Studio” in the search box at the top right, and press enter. Select the Black Studio TinyMCE Widget and click “install now”:
Then, click “activate”. The plugin is now activated and can be used. The Visual Editor widget is now available as one of your widgets on your widgets tab of your dashboard (Appearance > Widgets):

Installing the Flexible Widget Title Plugin
The Flexible Widget Title plugin is great to use in combination with the Visual Editor Plugin. It allows you to give your Visual Editor widgets a title for admin purposes – even if you don’t want this title to be visible on your site. Trust us, this is useful! ;)
To install the Flexible Widget Title Plugin, go to your Dashboard and navigate to the Plugins tab.
Choose “Add New” at the top:
Type “Flexible Widget Title” in the search box at the top right, and press enter. Select the Flexible Widget Title plugin by Hyyan Abo Fakher and click “install now”:

After clicking install, a blue button appears – click the blue Activate button:

The plugin is now activated and can be used. We’ll explain further down below how you can use it.
Installing the Widget Options Plugin
Installing the Widget options plugin
Navigate in your dashboard to Plugins > Add new:

Type “widget options” in the search box in the top right and press enter. The Widget Options plugin will appear in the search results, click on the “install now” button:

After that, click on the blue Activate button. That’s it :)
3. Managing your footer
Please note: if you’d prefer not to work on creating your own footer items for now – you can simply make the footer invisble by going into the widgets admin, and dragging the footer widgets from their “Footer Widget Area# to the “Inactive widget area (see point 5 below – the second graphic for where the Inactive Widget area is). If you remove the widgets from footer area 1, 2 and 3 the footer will stop showing.
Unlike the sidebar widget area, where you can add many widgets underneath each other, the footer widget area is more restricted in space because it’s orientation is horizontally.
In the widgets admin, (go to Appearance > Widgets), you see 4 footer widget areas for you to place widgets in:

You can set the number of columns (and with that the number of widgets) for your footer by going to the Theme Customizer. The number of columns you’ve set in the Theme Customizer determines how many of the footer widget areas will show up in your footer (2 columns, footer widget number 1 & 2, for 4 columns – all of the footer widget areas, etc).
To set the number of columns for your footer, in your Dashboard, navigate to Divi > Theme Customizer:

Navigate to footer:

and then Layout:

Select your column structure in the drop down at the top – we’re selecting 3 columns here. Don’t forget to save & publish:

4. Placing a sidebar next to your content
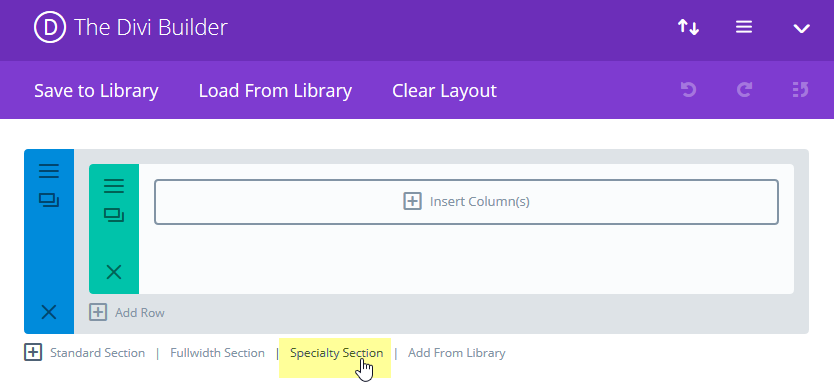
The Divi builder is very flexible, it allows you to easily place sidebars next to any content on your website with “Speciality Sections”.
Let’s create one – create a new page and make the Divi Builder active. Instead of adding a full width section or a regular section, click on insert a “Speciality Section”:
Choose a column layout – orange represents the sidebar, and the other green blocks represent rows (you can set these later, the green blocks here just show an example layout). We often use 2/3 content 1/3 sidebar. This gives a nice content width and also a good amount of width for your sidebar items:

Delete the regular section at the top of your page so you only have the speciality section left. Now the orange section represents your main content that you can add columns to, and the sidebar area asks you to add a module:

Let’s start with creating the sidebar. To add a sidebar, click on “insert Module(s)” in the sidebar area and insert a sidebar module, (you can use the Divi Sidebar, or our Dawn sidebar from the library, for this module it doesn’t matter):

Open the Sidebar Module settings. On the general settings Tab, open the Widget Area drop down – you’ll see the widget areas that are currently available:

You could now insert the general sidebar (called “sidebar” in your widget admin), but let’s assume you want to use a special sidebar here were you’re promoting services that are on other pages of your website.
To do this, go to your Widgets Admin; navigate to Appearance > Widgets. At the bottom of your Widget areas, there is the option to create a new Widget Area. Type a name and click create:

To see the new Widget area, you need to update the page, so press F5 to do so, and the new widget area is visible (it has a rather big red delete button in case you wanted to delete it):

This Widget area is now ready to start adding widgets to, which we’ll explain in the next section. First, let’s go back to the speciality section and now select our new widget area” Other services Sidebar”. Go back to the page you were creating, and make sure you update the page by exiting an re-enabling the visual builder, so that the new widget area can show up in the dropdown. Click on the sidebar module settings again and open the drop down. The widget area for your sidebar is now available. Select it to finish the sidebar module setup:

You’ll now need to insert widgets to this new widget area in your Widget Admin, for them to show up next to your content in this page. Placing widgets is explained next.
By the way, you can now create content for the rest of the width of the page as usual, by choosing a column layout and inserting modules.
5. Placing widgets in the Widget areas
To start adding widgets to your sidebar & footer, go to your website’s dashboard and navigate to “Appearance > Widgets”:

On the widgets screen, there are 3 sections; the available widgets section, the section where you place the widgets of your choice in your sidebar and footer spaces, and an inactive widget area:

Widgets in the back-end and front-end of your website
In the image below you can see how widgets in the sidebar section in the backend of a wordpress website correspond with what’s visible in the sidebar; there are 5 items in total:
- The first is a Visual Editor widget, that has been used to create an author section with a round image and small welcome text underneat;
- Next comes another Visual Editor used to create a “New Recipe” item, with a link underneath it to the recipe;
- Then a search box, that is one of the standard WordPress widgets that’s available (check that it’s there in the image above :) );
- another visual editor to add a “Sales Item” ;
- followed by a standard Recent Posts item from the available Widgets.

Creating and placing a widget
To start creating a widget, you first have to click the widget of your choice in the available widgets area and drag it to one of your widget areas, ie your sidebar or one of your footer locations:

Once it’s there you can click the small arrow and the widget expands so you can work on it;

Once open, you can create content just as you would in your normal WordPress Editor; you can add images, center them, add a text underneath and make that into a link, etc (further on in this class we’ll show you how to create some useful widgets):

Once done you click save within the widget. You can collapse the screen of this widget by clicking on the arrow at the top right, or choosing close at the left bottom.
Using the Flexible Widget Title Plugin to make your Visual Editor Widgets better manageble
TIP: For some widgets, such as image links (just an image linking to another part of your site or a promotion), you may not want to use a title for your widget. But if you have many of these visual editor widgets without title underneath each other, it becomes very hard to see what is what without opening the widgets. Because we have the Flexible Widget Title Plugin Installed and active, we can use a little trick (if you don’t have this plugin installed yet, scroll up to the top of this page to find instructions for installing it). It is possible to give your visual editor widgets a title without it being displayed on the front end of your website, by placing the title in brackets – for example [spring promotion]. Also see the picture below where we show the field to place the widget title, where we have placed the title in brackets, and another widget in the row of widgets in the sidebar widget space, with the title in brackets. By using brackets around the title is not shown on the front end of your website:

Deleting Widgets from your sidebar & saving them for later use
You can delete a widget from your sidebar by choosing delete at the bottom left of the widget (next to the close link). When choosing delete you will completely delete the widget. It is often a good idea to keep a widget that you’ve created for later use. Maybe it was a widget for a promotion that you run only part of the year, or maybe you will re-use the same promotion but simply add another image. You can store widgets with their settings for later use or as a template in the inactive widget area. Simply drag the widget from your sidebar to the Inactive Widget area to keep it safe.

Re-arranging widget Order
You can drag and drop widgets within your sidebar to rearrange their order. You can also drag and drop widgets to one of your footer widget areas, or move them about among the footer widget spaces available. There is no save button that you need to click after making these changes.
6. Customizing Widget Visibility
Once you have filled your widget areas, such as your sidebar, with widgets, they will show up the same on every page where you’ve specified that the sidebar should appear.
If you’d like to vary what items you show underneath or next to pages, you need to customize widget visibility.
To be able to do this, we need a Plugin called Widget Options. If you don’t have it installed yet, install it now by going to the instructions here.
Working with the plugin and your widgets
When the plugin is installed and active, several tabs with options appear at the bottom of each widget in your widgets tab of your dashboard (under Appearance > Widgets):

There are several tabs, but for us only the tab with the eye icon is relevant. On there there is a drop down menu “Hide/show”, giving you the option to hide or show the widget, and 3 tabs, one with Misc, one called post types, and once called Taxonomies.
On the tab “Post Types” you can set on which pages you’d like the widget to show or hide by ticking the boxes in front of the pages. By scrolling down here you can also see the option to show or hide the widget on all posts or pages, below the header “Custom post types”:

Here’s an example where we want to show the widget on the About me and Blog roll page – don’t forget to click Save when you are finished:

Setting visibility for your blog & blog posts
Controlling the visibility of widgets next to your blog posts & blog troll can be a little bit more tricky, just because it is easy to get confused about what is a blog post, a blog roll and your blog page and the way these work and are set up technically.
But no worries, it’s all explained here!
Showing widgets next to your blog roll
To show a widget next to your blog roll (the page showing the overview of your blog posts underneath each other), tick the box in front of your blog page on the Post Types tab (this page is usually called Blog, News or Articles):

Showing widgets next to all your individual blog posts
To also show your widget next to all your individual posts, tick “Posts” from “Custom post types” on the tab “Post types”:

Showing widgets next to certain types of blog posts
To show a widget only for certain categories of blog posts, use the “Taxonomies tab”, and tick the relevant blog post categories where you’d like the widget to show:

That’s it, now you can control where your widgets appear!
7. About the Widget Idea Library
In the Widget Idea Library we show you how to create some commonly used and handy widgets to use in your sidebars and footer.