Working with Images
Class overview
Here we give you the information you’ll need to create beautiful images for your website.

1. Recommended image sizes for your website
Whether you’re creating images for your sliders, as backgrounds for sections, or for widgets, you’ll need to know the image dimensions so you can create the correct size.
Many of our pre-styled modules have sample images, and if you’d like to replace the sample image, you can see the exact image dimensions that we used by going to the module settings by clicking the gear icon:
![]()
In the module, find where you can upload the image, and look at the file-name of the sample image. The sample image has the image dimensions in its file-name.
If you can’t see the complete file name in the box, place your cursor in the file name field and go to the right with the right arrow, or by using the end-key on your keyboard.
In the example below, the image is 1280 x 768 pixels. So that’s 1280 pixels wide by 768 pixels high, and you could replace it with your own image of these dimensions. The important dimension is the width, and you could use any other height for your image:

Below are the dimensions of the columns in your website. They help you to determine what image width you need for your columns.
Divi Column sizes for this Child Theme:
1 column (full-width): 1000 pixels
¾ column: 730 pixels
⅔ column: 640 pixels
½ column: 460 pixels
⅓ column: 280 pixels
¼ column: 190 pixels
Standard WordPress sidebar image size: 220 pixels
If you’d like to use images as a section background or as full width header background; use a minimum size of 1280 x 768 pixels. This is also large enough for the Parallex effect.
An Example
If you were making images for a slider in a single column layout, you would make the images 1000 pixels by whatever height you’d like to use. For a slider it is important that you make all your images the same height though (otherwise they’re going to jump around), so make them all the same dimensions of your choice.
In general it’s a really good idea to make your images as consistent as possible, so for example, make all your featured images for your blog posts the same size etc. This ensures that for example the post slider module won’t resize when showing post previews.
2. Cropping images to the right dimensions in Canva
Once you know what image size you need to use, let’s create the image. An easy way to create images is by using the Canva online graphic design application. You can register for Canva (it’s free), and once you have an account, start creating a design by clicking the “use custom dimensions” button in the top right: 
Next, watch the video below to see how to crop and resize your image with Canva:
If you prefer a written explanation with screenshots, open the toggle below.
Cropping and Resizing with Canva (text plus screenshots)
In Canva to start creating a design, click the “use custom dimensions” button in the top right:
Set the dimensions of your image, let’s say that in this case we are creating a full width header background image, then my size would be 1280 x 768 pixels, after setting the dimensions, click design:

Now you have a blank canvas to work with. To place an image, go to uploads:

Below the green button you see files that you’ve already uploaded, so if you have a brand new Canva account, there won’t be any files there yet. Click “upload your own images” :

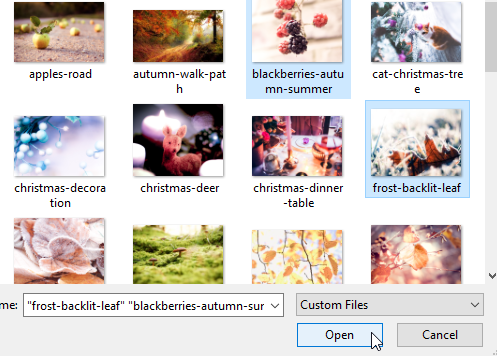
A browser window opens, find & select the files you’d like to upload (you can select multiple files and upload them together):
Your files are uploaded. If you hover over an uploaded file, you’ll see an information icon. Clicking it will open a little dialogue and allow you to delete the file again.
Now click a file to place it on your Canvas:

By holding Ctrl and dragging a corner you can make your image larger to ensure it fills you whole canvas (which has the dimensions of the image you’d like to create):

By clicking your left mouse button and holding it, and then dragging your image around, you can change the position of the image and what parts are visible within your canvas and show up in your final image:

When you’re happy with the placement of your image, go to the top right corner of your screen and click “download”. A little dialogue pops out giving you a few download options in the dropdown.
Saving as JPEG is the best option if it’s simply a photo you are creating. If you have placed a text or shape over your image (see below) then saving as PNG is best:

So in this case there is only a photo, so we choose JPEG and click download:

The file now downloads to your device.
3. Reducing file size & optimising your image for online use
It’s important to keep the file size of your images as small as possible, because this it makes your website easier to work with and quicker to load (which your website visitors will love). And, also very important, search engines such as Google like fast websites better and rank them higher. Lastly, if you would upload huge files to your website, you will quickly run out of hosting space for your website and you’d need a more expensive hosting package.
Plenty of good reasons to take image size seriously : )
When you download from Canva, your image is not optimised very much. But luckily it’s very easy to improve your file size with a free online app called TinyPNG.com. The name suggests it’s for PNG files only, but it can deal with both JPEG and PNG files :)
To resize and optimise an image, simply drag and drop it into the box on the TinyPNG website.
Here is a quick video of how that works:
Also see the toggle below for text and screenshots:
Optimizing your images with TinyPNG (text plus screenshots)
To resize and optimise an image, simply drag and drop it into the box on the Tiny PNG website.

The image gets uploaded and compressed, and after a few seconds your image is ready to download.
So save it on your device, and now your image is ready to use on your website.
By the way, it is also possible to upload several files in one go, and you can then use the “download all” button:

Your files are now ready to upload to your website :)
Note: even if you don’t use Canva, but an image-editing program on your computer (Photoshop, Illustrator, Gimp, Paint, Irfanview, etc.), and you save your images optimised for the web, they’ll usually still benefit from TinyPNG’s compression, so we recommend you alsways use it.
4. More Canva options & tips
Next to just cropping and sizing images, you can also use Canva to create great graphics, with text and shape overlays. You can also create amazing layouts with multiple images.
To explain all the features of Canva is beyond the scope of this classroom, but they have great tutorials that we recommend you look at.
We’d just like to show you a few more things here that we think will be handy at this stage…
Once you have created custom dimensions, let’s say for the background of your header module, then you can duplicate that graphic with the duplicate icon and a copy appears underneath:  You can now place a different image on the second canvas. This way you can easily create a whole set of, say, header background images. When you have several images underneath each other, the download button gives additional options. You can now choose to only download one of the images, by specifying the number of the image you’d like to download:
  … Or download multiple images at once. If you specify to download several images or “all” the download will be a zip folder with several images.
So, as an idea to make your workflow smoother, you could create different canvases with custom dimensions for different image sizes that you’ll use on your website.
You can name your designs by clicking on the untitled design (the temporary name of your file) at the top:  When you click on the Canva “home” logo, it takes you to the overview where you can see all your designs:

5. Links to Canva & further tutorials
Canva is a fun and beautiful way of creating graphics for your website. There are many other applications too, but this one has everything you’re likely to need and works in your browser, so you can use it on any system.
Canva is free, easy and intuitive to use, and they have very good tutorials. We highly recommend exploring Canva for creating graphics for your website! As long as you don’t buy any of their premium graphics (and it’s not necessary to do so, because there are many free options also) it’s completely free!
Useful links:
Learn how to use Canva with their workshops.
There are also many very useful graphic design tutorials.
And the Design Stream is a great place to see what others create and to get inspiration (you need to be logged into your Canva account to access this resource).