Email & Contact Form
Class overview
In this class we’ll explain how to work with the contact options of your website:

1. Working with your Webmail
If you have one of our website packages, we’ll have set up up to 3 email address for you for your website. These email accounts are managed through webmail, an online mail service provider than runs through your hosting. You can log in to your webmail from anywhere and any computer. It is also possible to forward your webmail to an email program such as outlook.
In the e-book “working with your webmail” we show you how to work with your webmail. It’s good to read it before you start using it, because it also contains important info about exporting and backing up emails – you have lots of space for email but your hosting space will eventually fill up if left unmanaged!
2. Setting up your contact forms
With Divi’s Contact Module you can easily add contact forms to your pages. Here we’ll explain how to set up a contact page for your website.
Please make sure to test all your contact forms before you launch your site, and it is also a good idea to re-check every now and then, especially before the launch of a new product or service.
Create a new page and give it a title, it could be “contact” or any other name you’d like to use.
Click the purple “Use the Divi Builder” button.
Insert for example a 2/3 – 1/3 column structure and insert a contact module from the library in the 2/3 column.
Open the module’s settings to configure it.
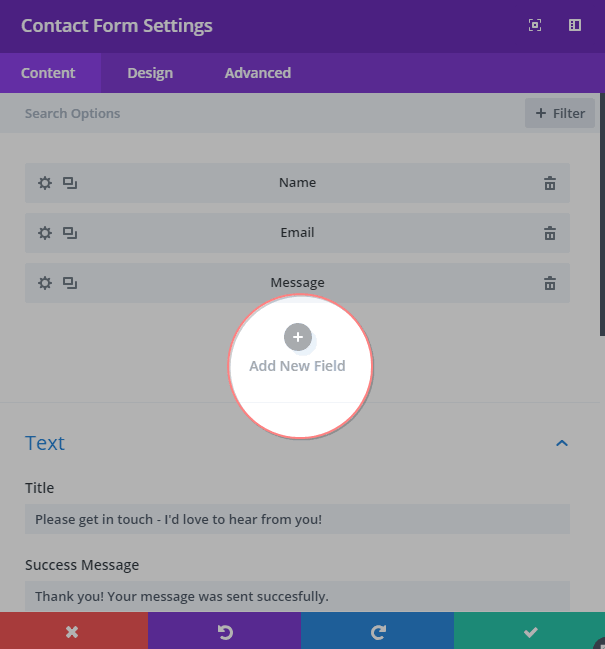
At the top you can set the fields that you’d like to use in your form. For our Child Theme module, there is a name, email and message field already:

You can add a field by clicking “Add New field” :

A dialogue will ask you to make a few settings.
Give the field a unique ID. It is very important that the ID is unique, and that your Field ID only uses normal English characters, no special characters such as & or #, and you can also not use a space. You can use a hyphen or an underscore, so for example “First Name” wouldn’t work but “First-name” or “First_name” or “firstname” would work. If you do this wrong your contact forms will not work, so please pay attention to this and check this first if you encounter problems :)
Also give your field a Title, and set the type of field in the drop down. In the case of a phone number field, this would be input field. Email is for email addresses and textarea for message fields:
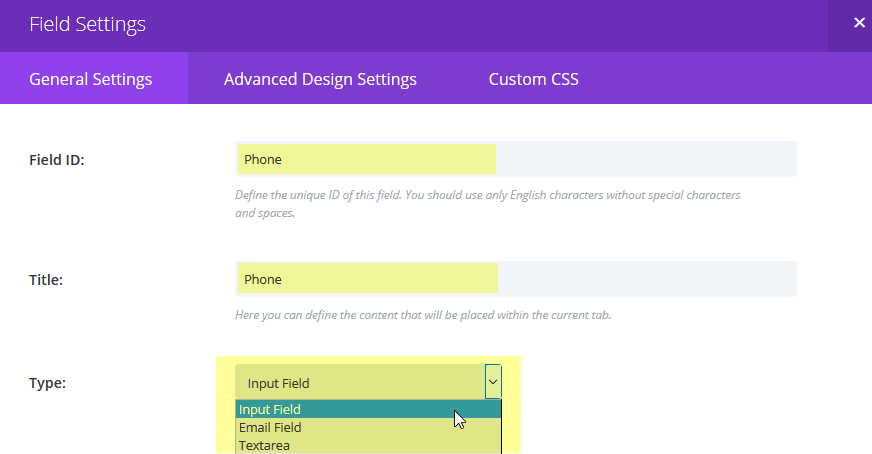
Underneath there are two toggles, you can set if this is a required field that has to be filled in. In the case of the phone number we’ve set it to No (not required). And there is a full width option which makes the field full width. It is set to yes in our child theme contact module because we like the way it looks :) Click Save to save your settings.

Still on the general settings tab, scroll down a bit to make the next settings; set the email address that you’d like to send the message to, set the title for your form, and decide whether you’d like to use a Captcha (recommended to avoid receiving a lot of spam messages):

Further down there is a message pattern field that you can leave blank. You can also use a re-direct: when someone submits a message, after sending you their message you can send them to a special page, for example a thank you page where you can place a lovely personal thank you message. Toggle the “Enable Redirect URL” to yes if you’d like to use a redirect and specify the page URL below.
Finally, enter a success message, the text that is shown after the message was sent successfully (this is seen if you don’t have a page redirect set up):

Don’t forget to save your work. Your contact module is ready.
You can now add other modules to the second column, for example a text module for your contact details and a social follow module for your Social Media profiles.
If you have a brick and mortar business, you could add a map module at the bottom to show where you are.

How to add a tickbox to your contactform
Sometimes you’d like to add a tickbox to your contactform, for example to let people agree to your terms, or add them to your newsletter list. Here is what that could look like:

In the example people have the option to tick a box and be added to your newsletter list.
Please note: this is a manual process. So you have to manually add them to your list if they’ve ticked the box. Also, to comply with the terms of your email marketing provider (like MailChimp), you probably need to keep a record of the form submission you received as proof of signup.
How do you add this tickbox?
Open the contact form module and click ‘add new field’
Next, in the text field, type a field ID and a title. The title is what your visitors will see on the form. The field ID is for your own reference only. Please note that field Field ID must be unique (so you can’t use the same one twice), and can only have English characters in it without special characters or spaces.

Now go into field options and change the type to checkboxes… Also make sure you set required field to ‘no’, otherwise your visitors won’t be able to submit the form without ticking the box.

Finally, and optionally, under design > layout, you can set ‘make fullwidth’ to no.

When you’re done, save your changes and test your form to make sure it works the way you like.